1.Enter the diagnostic system
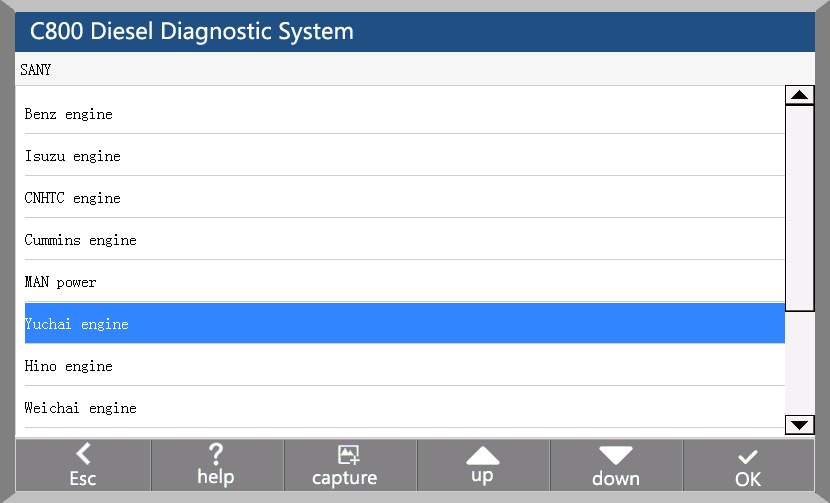
You can select the corresponding vehicle type by selecting the display area on the left side of the main interface, and then select the brand, system and system function in the right model selection area to enter the CAR FANS C800.
For example: After entering the main interface of the car diagnosis, you can: click on the “truck series” -> “SANY” -> “Yuchai engine”, and then select the diagnostic function you want to test diagnostic tests.

2.Start Diagnostic
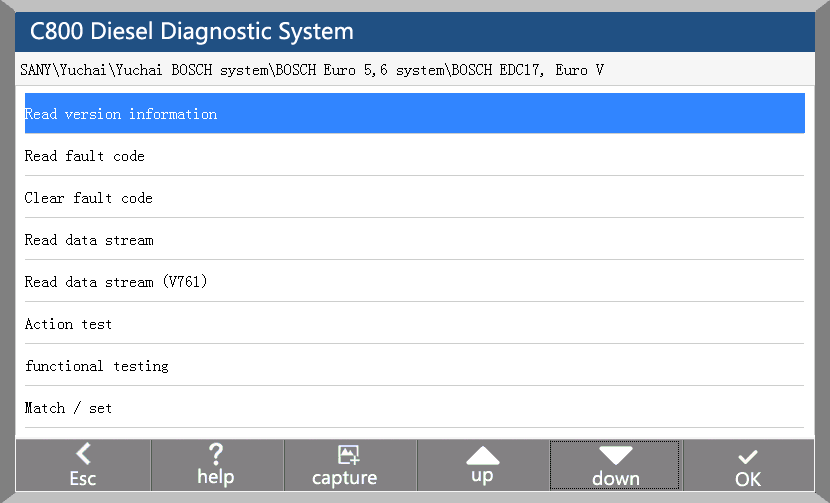
After entering the system, the functions that can be implemented include:
1. Identification
2. Read Fault code
3. Erase Fault code
4. Actual Values
5. Actuators
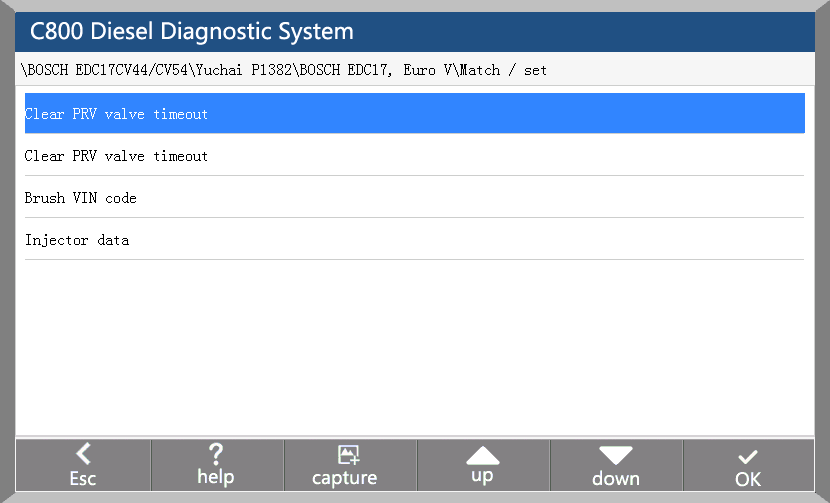
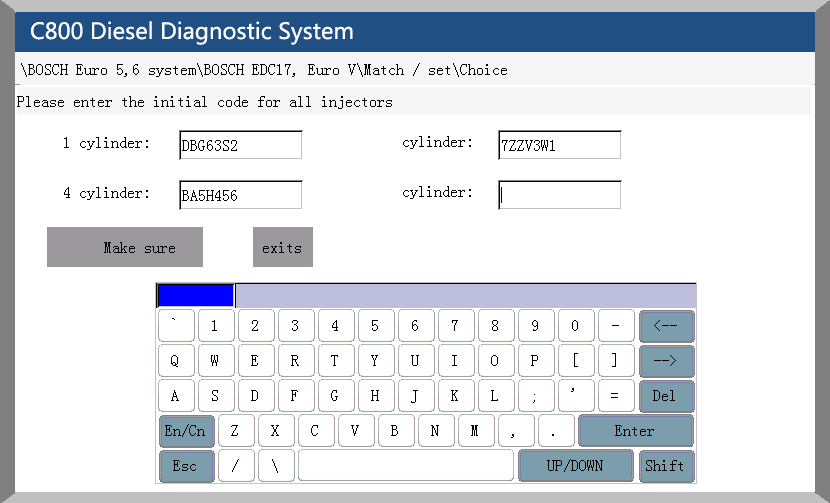
6. Advance Functions:Adjustment/Settings、Function Test、Special function, calibration etc. Specific functions will be different according to different models of the brand and the system, take Bosch engine in Foton engine system as an example:

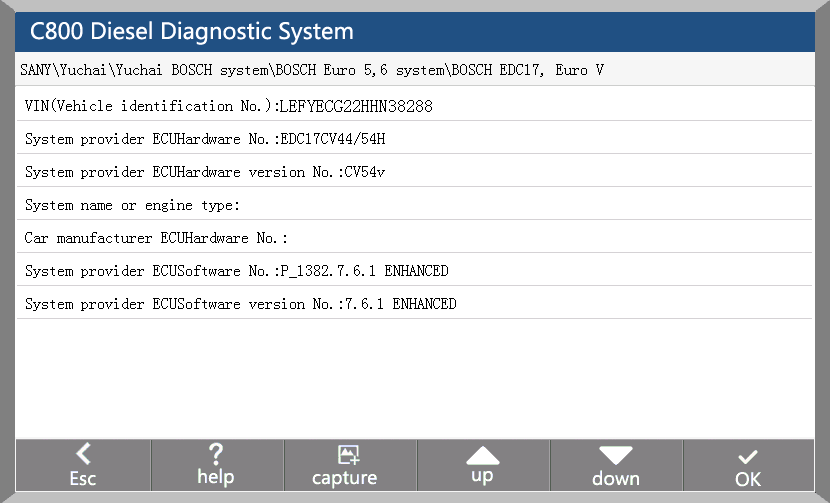
3.Identification
Identification is the vehicle and system information in ECU. When the vehicle control unit need to be replaced, it is necessary to read the original control unit information and record it as a reference for purchasing a new control Heavy Duty Scanner. When the new control unit is encoded, the original control unit information is required.

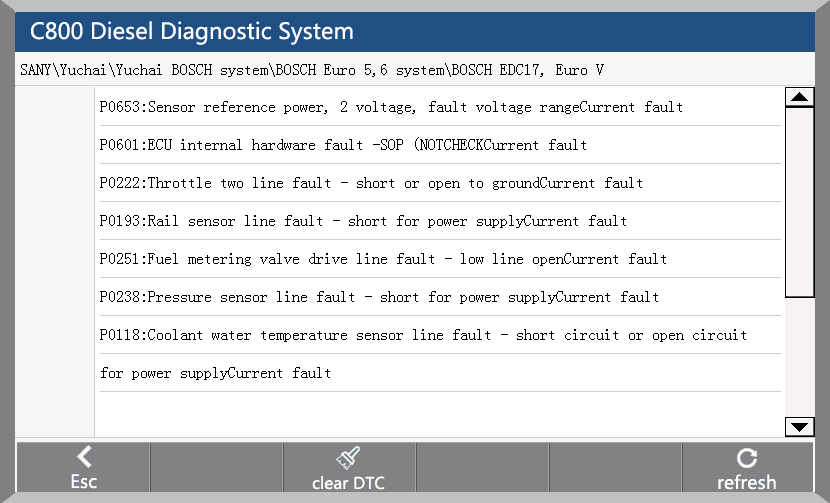
4.Read Fault code
Read the fault code function can read ECU fault code to help maintenance personnel quickly found the cause of vehicle failure.

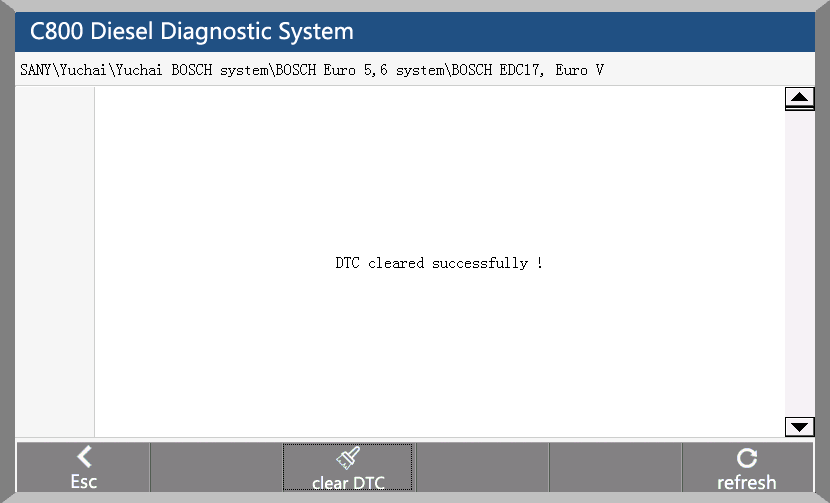
5.Erase Fault code
Clear the fault code stored in the ECU.

Note: General models, please follow the regular order, first read the fault code, and record (or print) and then clear the fault code, test, read the fault code again to verify, repair the vehicle, clear the fault code, test again to confirm the fault code The current hard fault code can not be cleared, if the oxygen sensor, knock sensor, mixed gas correction, cylinder fire and the like type of technical code can be removed immediately, but in a certain period will appear. Must be completely troubleshooting after the fault code will not appear again.
6. Actual Values
You can determine whether the various parts of the vehicle are faulty through actual values.
Method of operation:
1. After entering the diagnostic function, click “Actual values”, pop-up dialog box.
2. Click the “Select All” check box to select all actual values; you can also click the check box before each actual value to select the data stream you want to read.
3. Click the “Read actual values” button. The interface displays the name, result, and unit of the data stream.

7.Actuators
In order to test the electronic control system in the implementation of components can work properly.
Method of operation:
1. After entering the diagnostic function, select “Actuators”, the interface will display all the action can be tested.
2. Click on an item to enter the action test interface. The actuators include three states: open, close, and exit.
3. Click “Open”, the status of the action test is turned on.
4. Click “Close”, the status of the action test is off.
5. Click “Exit” to exit this action test.


Advance Functions:Adjustment/Settings、Function Test、Special function, calibration
For example: diesel fuel injector code, idle speed adjustment, broken cylinder test, calibration and so on by Obd2tool.com.


http://cheapobd2.com/2018/07/28/how-to-diagnostic-with-carfans-c800/
You can select the corresponding vehicle type by selecting the display area on the left side of the main interface, and then select the brand, system and system function in the right model selection area to enter the CAR FANS C800.
For example: After entering the main interface of the car diagnosis, you can: click on the “truck series” -> “SANY” -> “Yuchai engine”, and then select the diagnostic function you want to test diagnostic tests.
2.Start Diagnostic
After entering the system, the functions that can be implemented include:
1. Identification
2. Read Fault code
3. Erase Fault code
4. Actual Values
5. Actuators
6. Advance Functions:Adjustment/Settings、Function Test、Special function, calibration etc. Specific functions will be different according to different models of the brand and the system, take Bosch engine in Foton engine system as an example:
3.Identification
Identification is the vehicle and system information in ECU. When the vehicle control unit need to be replaced, it is necessary to read the original control unit information and record it as a reference for purchasing a new control Heavy Duty Scanner. When the new control unit is encoded, the original control unit information is required.
4.Read Fault code
Read the fault code function can read ECU fault code to help maintenance personnel quickly found the cause of vehicle failure.
5.Erase Fault code
Clear the fault code stored in the ECU.
Note: General models, please follow the regular order, first read the fault code, and record (or print) and then clear the fault code, test, read the fault code again to verify, repair the vehicle, clear the fault code, test again to confirm the fault code The current hard fault code can not be cleared, if the oxygen sensor, knock sensor, mixed gas correction, cylinder fire and the like type of technical code can be removed immediately, but in a certain period will appear. Must be completely troubleshooting after the fault code will not appear again.
6. Actual Values
You can determine whether the various parts of the vehicle are faulty through actual values.
Method of operation:
1. After entering the diagnostic function, click “Actual values”, pop-up dialog box.
2. Click the “Select All” check box to select all actual values; you can also click the check box before each actual value to select the data stream you want to read.
3. Click the “Read actual values” button. The interface displays the name, result, and unit of the data stream.

7.Actuators
In order to test the electronic control system in the implementation of components can work properly.
Method of operation:
1. After entering the diagnostic function, select “Actuators”, the interface will display all the action can be tested.
2. Click on an item to enter the action test interface. The actuators include three states: open, close, and exit.
3. Click “Open”, the status of the action test is turned on.
4. Click “Close”, the status of the action test is off.
5. Click “Exit” to exit this action test.


Advance Functions:Adjustment/Settings、Function Test、Special function, calibration
For example: diesel fuel injector code, idle speed adjustment, broken cylinder test, calibration and so on by Obd2tool.com.

Comments
Post a Comment