If you are servicing a vehicle with no movement in drive or reverse
gear, follow the procedure shown below.And for more Hyundai
projects,please check here:Hyundai Repair Cases
REPAIR PROCEDURE:
1.Check for DTC in both the “Engine” and “Automatic Transaxle” menus:
* If DTC are found,you need repair it firstly.
* If no DTC are found, go to Step 2.
2.Remove the dipstick and check the ATF for a strong burnt smell. If the smell does not provide conclusive results, remove the oil pan and check for metal particles in the pan:
* If a strong burnt smell or metal particles are found, replace the transaxle
* If not, go to Step 3
NOTE: ATF that is a dark brown or black color does not indicate an internal transaxle concern;do not replace the transaxle. SPIII may change color to a dark brown after 10,000 to 25,000
miles in service. This change is normal for this type of ATF.
VERIFY THE RANGE SWITCH ADJUSTMENT:
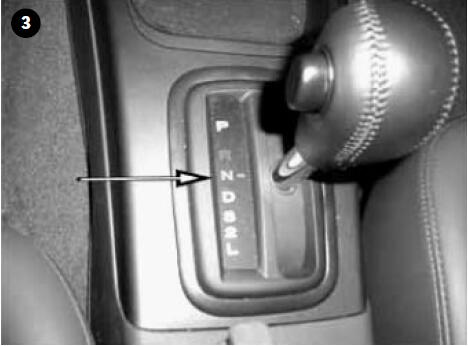
3.Move the shift lever to “N”.

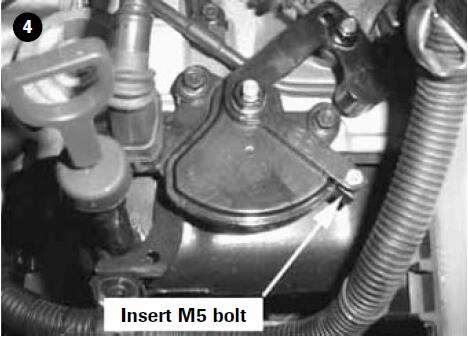
4.Insert a 5 mm drill or M5 (5 mm) bolt in the adjustment hole of the range switch. Check that the drill or bolt fits into the adjustment holes.
* If not, go to Step 5
* If so, go to Step 9

5.Loosen the two 10 mm mounting bolts.

6.Disconnect the shift cable at the lever.
7.Insert a 5 mm drill or M5 (5 mm) bolt in the adjustment hole of the range switch. Tighten the two 10 mm mounting bolts to specification.Specification: 7-8 ft.lb (10-12 Nm, 100-120 kg.cm)
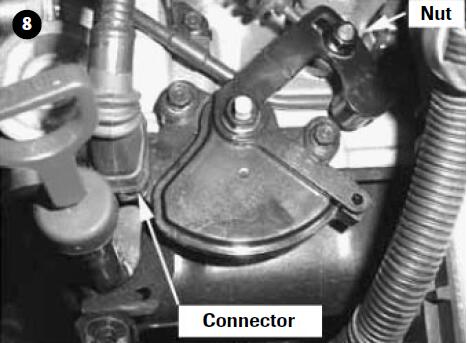
8.Move the shift lever to the “N” position. Attach the shift cable to the lever and install the nut. Tighten the nut to specification.Specification: 9-10 ft.lb(12-13 Nm, 120-130 kg.cm)
Remove the 5 mm drill or M5 bolt.

VERIFY THE SIGNAL FROM THE RANGE SWITCH:
9.Attach a Hi-Scan Pro and select:
* “Hyundai Vehicle Diagnosis”
* Vehicle
* “Automatic Transaxle” menu
* “Current Data” menu
* “Select Lever Switch” and “Shift Position:
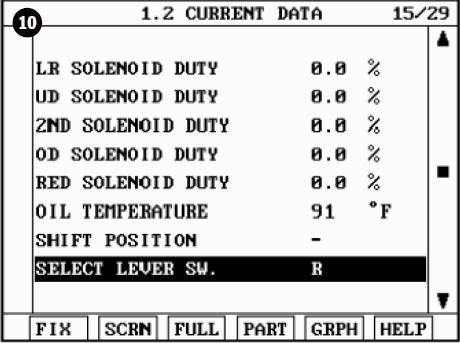
10.Move the shift lever to Reverse.
* Monitor “Select Lever Switch”.
* If “R” is displayed, the TCM is receiving the correct signal from the range switch. Go to Step 11.
* If not, check the connector at the TCM and the range switch for a bent pin or pin not fully inserted.
Check the wiring harness for an open or short circuit. If ok, replace the range switch.

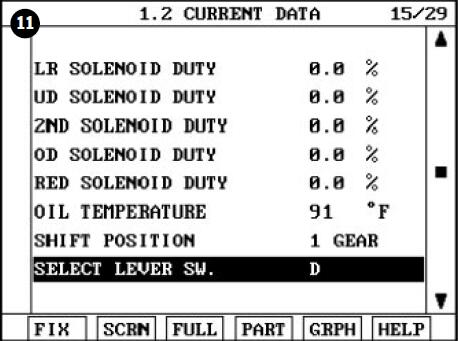
11.Move the shift lever to Drive.
* Monitor “Shift Position” and “Select Lever Switch”.
* If “D” and “GEAR 1” are displayed, the TCM is receiving the correct signal from the range switch. Go to Step 12.
* If not, check the connector at the Auto diagnostic tool and the range switch for a bent pin or pin not fully inserted.Check the wiring harness for an open or short circuit. If ok, replace the range switch.
12.Install the A/T Tester, P/N 09450- AT000, to the vehicle:
* Shift the transaxle to “D”.Move the gear selector switch of the A/T Tester and shift manually in 1, 2, 3, 4,and 5 gears (if equipped).

NOTE: Use the “EF, XG” switch for side-pan transaxles and the “LC” switch for bottompan transaxles.
* Disconnect the A/T Tester from the solenoid. Do not reconnect the harness connector to the solenoid. Shift the transaxle to “R”.
* If no movement, replace the transaxle.
* If the vehicle moves, check the harness connector at the TCM and the solenoid for a bent pin or pin not fully inserted. Check the wiring harness for an open or short circuit.
* If no problem is found, swap a TCM from a similar vehicle and test for movement in Drive and
Reverse. If the vehicle moves in Drive and Reverse, replace the TCM.
REPAIR PROCEDURE:
1.Check for DTC in both the “Engine” and “Automatic Transaxle” menus:
* If DTC are found,you need repair it firstly.
* If no DTC are found, go to Step 2.
2.Remove the dipstick and check the ATF for a strong burnt smell. If the smell does not provide conclusive results, remove the oil pan and check for metal particles in the pan:
* If a strong burnt smell or metal particles are found, replace the transaxle
* If not, go to Step 3
NOTE: ATF that is a dark brown or black color does not indicate an internal transaxle concern;do not replace the transaxle. SPIII may change color to a dark brown after 10,000 to 25,000
miles in service. This change is normal for this type of ATF.
VERIFY THE RANGE SWITCH ADJUSTMENT:
3.Move the shift lever to “N”.
4.Insert a 5 mm drill or M5 (5 mm) bolt in the adjustment hole of the range switch. Check that the drill or bolt fits into the adjustment holes.
* If not, go to Step 5
* If so, go to Step 9
5.Loosen the two 10 mm mounting bolts.
6.Disconnect the shift cable at the lever.
7.Insert a 5 mm drill or M5 (5 mm) bolt in the adjustment hole of the range switch. Tighten the two 10 mm mounting bolts to specification.Specification: 7-8 ft.lb (10-12 Nm, 100-120 kg.cm)
8.Move the shift lever to the “N” position. Attach the shift cable to the lever and install the nut. Tighten the nut to specification.Specification: 9-10 ft.lb(12-13 Nm, 120-130 kg.cm)
Remove the 5 mm drill or M5 bolt.
VERIFY THE SIGNAL FROM THE RANGE SWITCH:
9.Attach a Hi-Scan Pro and select:
* “Hyundai Vehicle Diagnosis”
* Vehicle
* “Automatic Transaxle” menu
* “Current Data” menu
* “Select Lever Switch” and “Shift Position:
10.Move the shift lever to Reverse.
* Monitor “Select Lever Switch”.
* If “R” is displayed, the TCM is receiving the correct signal from the range switch. Go to Step 11.
* If not, check the connector at the TCM and the range switch for a bent pin or pin not fully inserted.
Check the wiring harness for an open or short circuit. If ok, replace the range switch.
11.Move the shift lever to Drive.
* Monitor “Shift Position” and “Select Lever Switch”.
* If “D” and “GEAR 1” are displayed, the TCM is receiving the correct signal from the range switch. Go to Step 12.
* If not, check the connector at the Auto diagnostic tool and the range switch for a bent pin or pin not fully inserted.Check the wiring harness for an open or short circuit. If ok, replace the range switch.
12.Install the A/T Tester, P/N 09450- AT000, to the vehicle:
* Shift the transaxle to “D”.Move the gear selector switch of the A/T Tester and shift manually in 1, 2, 3, 4,and 5 gears (if equipped).

NOTE: Use the “EF, XG” switch for side-pan transaxles and the “LC” switch for bottompan transaxles.
* Disconnect the A/T Tester from the solenoid. Do not reconnect the harness connector to the solenoid. Shift the transaxle to “R”.
* If no movement, replace the transaxle.
* If the vehicle moves, check the harness connector at the TCM and the solenoid for a bent pin or pin not fully inserted. Check the wiring harness for an open or short circuit.
* If no problem is found, swap a TCM from a similar vehicle and test for movement in Drive and
Reverse. If the vehicle moves in Drive and Reverse, replace the TCM.
Comments
Post a Comment