
Digimaster3 correct mileage on 2014 Hyundai Sonata failure

Have Digimaster 3 
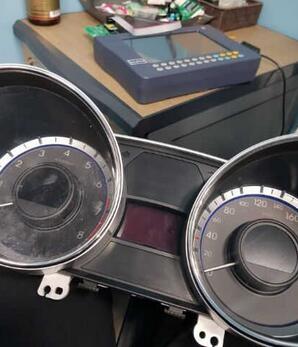
Odometer Correct tool to correct mileage for 2014 Hyundai Sonata, 
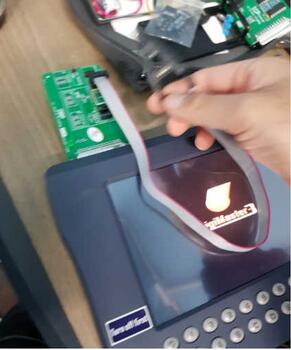
firstly failed to do and then get data lost because of using the black clip adapter.
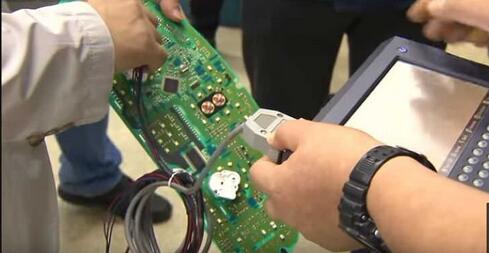
Here 6 images showing failure and how the user connected:
digimaster3-on-2014-hyundai-sonata-failure-1
digimaster3-on-2014-hyundai-sonata-failure-3
digimaster3-on-2014-hyundai-sonata-failure-4
digimaster3-on-2014-hyundai-sonata-failure-5
digimaster3-on-2014-hyundai-sonata-failure-6
Solution provided by Obd2tool.com engineer:
It’s not safe to collect data by using the clip adapter (shown as image 4), which will cause data lost easily, that’s why the D3 package doesn’t contain this clip adapter.
The correct method:
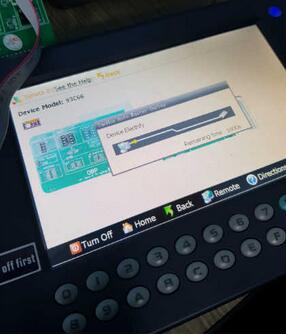
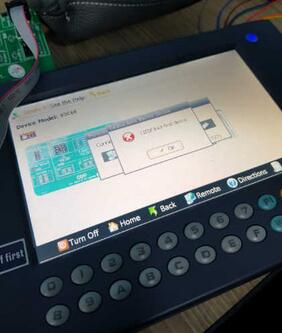
Remove the chip 93C66, weld it on the OBP adapter to read out the original mileage, then reset a mileage value you want.
One more question: I saw many videos the posters use the clip adapter to collect data and succeed, why I failed?
digimaster3-on-2014-hyundai-sonata-failure-7
Answer: It’s not 100% percent to read out the data using the clip adapter. If the contact is bad, the data is easy to lose.
But it takes too much time and inconvenient, I already lost data. Now it shows 0 ……
Solution: finally, obd2tool.com customer service send the data “Hyundai Sonata dashboard 93C66 -203KM” to this user and finally problem solved.

Comments

Popular posts from this blog

Xprog 6.12 5.84, 5.74, 5.60, 5.55, 5.51, 100% Works Software Free Download

Free download the newest Xprog V6.12 , XPROG 5.84 , XPROG 5.74 , XPROG 5.60 , Xprog 5.55 and XPROG 5.51. 1.XPROG-M 6.12 free download: Link 1: https://mega.nz/#!625RxAqJ!Y7IInI5ZhG3titLMPnFOvALbOa2RHIp7ENG2o4PIzag Password: No need Link 2: https://share.weiyun.com/5m5Vkw0 Password: fxo5qz Xprog 6.12 XPROG V6.12 installation video: XPROG-M V6.12 Using tips and installation guide: https://www.obd2tool.com/blog/2020/02/29/how-to-use-and-install-xprog-v6-12-on-win-xp-win7win8/ 2. XPROG V5.84 free download: https://mega.nz/#!7vpDwQ4D!MrdDW0tVf-6-wXtGKqpUmj7CA2HFlFlMf5AeNvYgRbI Tips for installing Xprog V5.84. 1.Disable anti-virus program when downloading software and running software. 2.Uninstall all the software and USB drivers of the old version xprog-box on your computer, then install the new XPROG5.84 software. 3.Run 5.84 Regsisty program for several timeswhen installing software 4.Run 5.84 Regsisty file for 2 times before you run software everytime . ...

How to setup BMW ISTA/P Loader for ICOM A2 ENET cable K+DCAN adapter

The text here, as a user manual of BMW ISTA/P Loader / ICOM Emulator,  is aimed to help those puzzled with ISTA/P Loader setup for  ICOM A2 , ENET cable, K+DCAN  USB interface. Note: all info here not original, shared by a forum member So try at your own risk! Main content: Part 1 – Compatible device Part 2 – Latest ISTA/P Loader update information Part 3 – How to install ISTA/P Loader v4.x Part 4 – How to use  ISTA/P loader with ICOM A2, K+DCAN cable, ENET cable Part 5 – How to shut down ISTA/P Part 1 – Compatible device: ISTA/P Loader compatible with ICOM A2 (OEM or clone), K+DCAN USB and ENET   Part 2 – Latest ISTA/P Loader update information: NEWEST – ISTA/P Loader V4.8  update info: Free download BMW ISTA-P Loader V4.8.7 to get all new info yourself …… ISTA/P Loader V4.2 update info: Custom resolution option added Improved detection of bmw scan tool ISTA-P install location. Improved compatibility with windows 10 Code...

How to setup ICOM Next A WLAN connection

  ICOM Next  Wireless diagnostic 1.Set router wireless, wireless SSID name:ISAP,password:autosvs12345 2.Set ICOM NEXT A wireless, connected to the router, wireless SSID name:ISAP,password:autosvs12345, (Same as router setting, After setting the ICOM NEXT need to reconnect to vehicle) 3.BMW diagnostic PC connect to wireless router ISAP, you can start wireless diagnosis. 1.Configuration router 2.Configuration ICOM NEXT A 3.Same as the router configuration; 4.After ICOM NEXT configuration is completed, you need to reconnect, ICOM NEXT will automatically open the WLAN connection function; 5.Connect ISAP WIFI; 6.After the ISAP WIFI connection is successful, you can use the ISTA diagnostic test