This JLR DoIP VCI
can compatible with the Pathfinder Software and all JLR vehicles with
the new vehicle architectures found in 2017 and newer vehicles (from the
Range Rover/Range Rover Sport L405/L494),In addition to the 2017 and
newer vehicles.
Here is the instructions for JLR DoIP VCI where to download the SDD and Pathfinder,and how to intall and how to contact.
Software installation
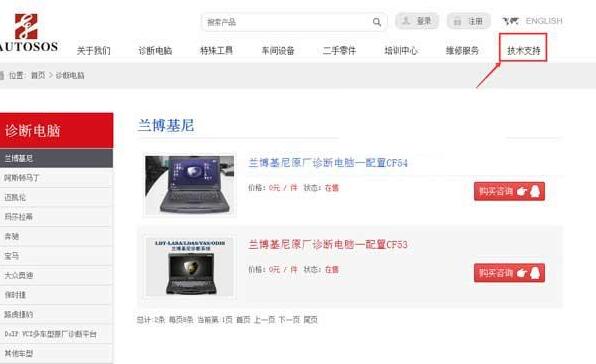
A. Log in the official website: www.autosos.com.cn

B. Click the “Technical Support”(Chinese word seems like “技术支持”)

C. Click the “software download” (Chinese word seems like “SDD和PathFinder软件下载”); Then you can download SDD and PathFinder. Meanwhile, it will take you about two or three days to download the complete data of PathFinder with network continuously.
Tips:
When the download finished, one more thing you need to do is install driver ( VCI manager);
If you have already got an account which can log in the software FathFinder directly, then you can use it for your job. However, you can contact with us looking for support if you do not have the account.
E-mail: sales@obd2tool.com
How to install driver for the interface-DoIP VCI
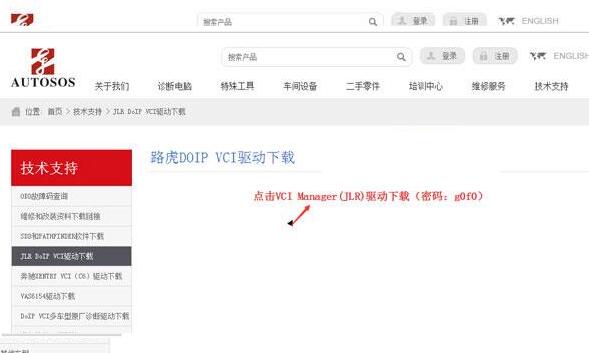
A. Click the“技术支持”,then choose the “driver download”(Chinese word seems like JLR DOIP VCI驱动下载”)You can follow the picture below.
By the way, the password for the driver downlosd: g0f0
B. Please pay more attention to the version of the DoIP VCI driver, it always should be the latest version. So the best you should update the driver without delay.

The connection of DOIP VCI
A. Connect with USB; (It’s easy for you.)
B. Connect with WIFI; (You can choose the Wifi which named “DoIP-VCI-11D4”, and the last four numbers are random.)

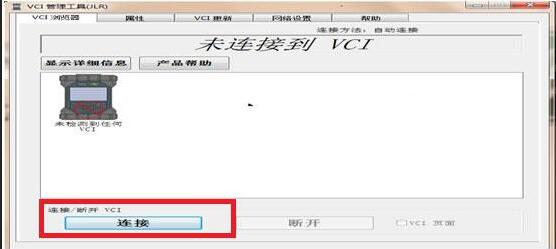
C. The Connection between the DoIP VCI and computer
Following the picture below, open the VCI Manager and click the “connect” (Chinese word seems like “连接”)

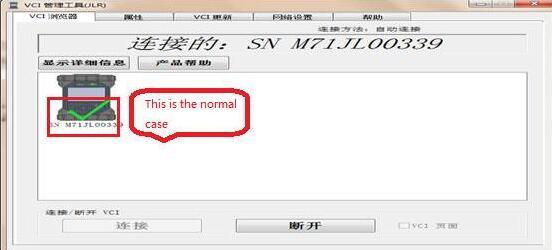
D. Check the connection status with the computer.
Refer to the figure below, when it shows a green check mark, run is ok.

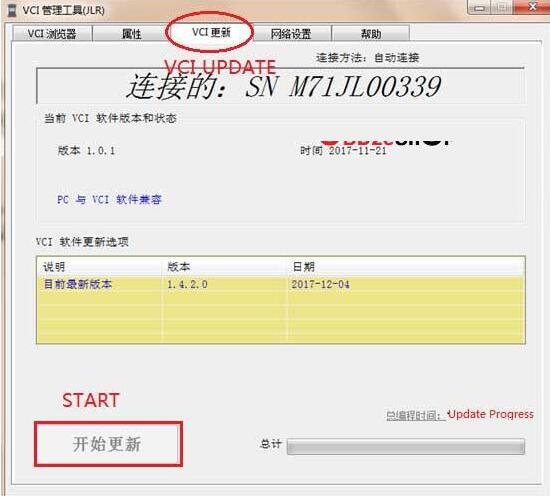
E. Update of DoIP VCI’ firmware.
Open“VCI manager”;
Then click the “VCI Update” (Chinese word seems like “VCI更新”);
Click the “start” (Chinese word seems like “开始更新”)and you can get the update progress on the right;
TIPS:
Pay more attention! ! ! When you click the “start”, it cannot be interrupted or stopped. Otherwise the DoIP VCI will be damaged. You can disconnect when it finished.

F. SDD can get the hardware directly, it’s perfect if the icon is green.
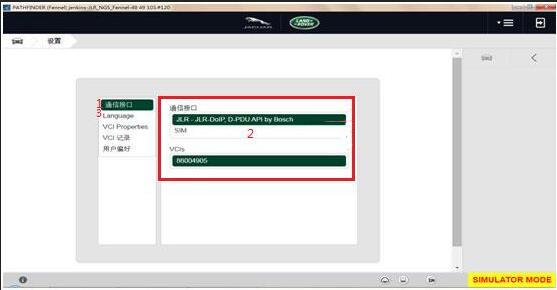
PathFinder need to set the network interface.
Log in with account firstly;
Click “cancel” (Chinese word seems like “取消”);
It don’t connect successfully if it shows “SIM” “SimFiles”, you should change them into “JLR-JLR-DoIP, D-PDU API by Bosch” “86004905”. Now you can use it for diagnosis.


Here is the instructions for JLR DoIP VCI where to download the SDD and Pathfinder,and how to intall and how to contact.
Software installation
A. Log in the official website: www.autosos.com.cn

B. Click the “Technical Support”(Chinese word seems like “技术支持”)
C. Click the “software download” (Chinese word seems like “SDD和PathFinder软件下载”); Then you can download SDD and PathFinder. Meanwhile, it will take you about two or three days to download the complete data of PathFinder with network continuously.
Tips:
When the download finished, one more thing you need to do is install driver ( VCI manager);
If you have already got an account which can log in the software FathFinder directly, then you can use it for your job. However, you can contact with us looking for support if you do not have the account.
E-mail: sales@obd2tool.com
How to install driver for the interface-DoIP VCI
A. Click the“技术支持”,then choose the “driver download”(Chinese word seems like JLR DOIP VCI驱动下载”)You can follow the picture below.
By the way, the password for the driver downlosd: g0f0
B. Please pay more attention to the version of the DoIP VCI driver, it always should be the latest version. So the best you should update the driver without delay.

The connection of DOIP VCI
A. Connect with USB; (It’s easy for you.)
B. Connect with WIFI; (You can choose the Wifi which named “DoIP-VCI-11D4”, and the last four numbers are random.)
C. The Connection between the DoIP VCI and computer
Following the picture below, open the VCI Manager and click the “connect” (Chinese word seems like “连接”)
D. Check the connection status with the computer.
Refer to the figure below, when it shows a green check mark, run is ok.
E. Update of DoIP VCI’ firmware.
Open“VCI manager”;
Then click the “VCI Update” (Chinese word seems like “VCI更新”);
Click the “start” (Chinese word seems like “开始更新”)and you can get the update progress on the right;
TIPS:
Pay more attention! ! ! When you click the “start”, it cannot be interrupted or stopped. Otherwise the DoIP VCI will be damaged. You can disconnect when it finished.
F. SDD can get the hardware directly, it’s perfect if the icon is green.
PathFinder need to set the network interface.
Log in with account firstly;
Click “cancel” (Chinese word seems like “取消”);
It don’t connect successfully if it shows “SIM” “SimFiles”, you should change them into “JLR-JLR-DoIP, D-PDU API by Bosch” “86004905”. Now you can use it for diagnosis.

Comments
Post a Comment